Solis Hybrid inverter Setting and Complete installation

How to setup S6-EH1P(3-8)K-L-PRO hybrid inverter via SolisCloud
Introduction
Introducing the Solis S6 Hybrid inverter series with an innovative parallel function, allowing users to connect up to six devices for optimized energy production. It's crucial to use the same size inverters and batteries for parallel connections, ensuring seamless integration. Solis is compatible with various battery manufacturers, but users must review datasheets for compatibility.
NOTE: Currently supporting up to six devices in parallel and unbalanced loads on grid side are not yet supported. Stay tuned for updates as we work on resolving this limitation, promising a more efficient and versatile solar energy experience with Solis S6 Hybrid inverters.
Additionally, please note that inverters produced before January 2023 do not comply with the requirements for parallel operation and, therefore, cannot be used
Prerequisites
Please make sure that you have the following:
- To enable paralleling, it is essential to have a specific firmware version installed on your inverter. Additionally, it is necessary for all inverters to have the same firmware version installed. Please contact the Solis Support Line for further details and assistance.
- Standard CAT5/6 ethernet cable
- Mobile phone with Solis Cloud App installed (if possible, have several phones at hand. This way it will be easier to set up all inverters)
- Only 1 Datalogger (S2 and S4 model) for monitoring (optional)
Meter Connection:
- The Solis S6-EH3P(3-10)K-H Series inverter includes the standard Eastron SDM630MCT meter, which supports self-consumption mode, export power control, monitoring, and more.
- It is essential to install only the meter provided with the inverter to ensure proper functionality. Using an incorrect meter may result in the inverter not performing as intended.
- IMPORTANT: Connect the meter only to the MASTER INVERTER.
- Please refer to the diagram below for meter installation instructions.

Inverter Connection:
Before setting up the parallel configuration, it is essential to verify the normal functioning of each individual inverter. This helps prevent anomalies in parallel inverters caused by the original parameter settings of a single inverter. Set up each inverter one by one, ensuring they operate correctly without any alarms, before connecting the parallel cable.
It is crucial to ensure the proper setup of all inverters initially. Each inverter should be configured with the correct time, work mode, country code, and appropriate battery selection. Only the Master inverter should be connected to a meter, and the correct meter should be selected during the setup process. Ensure that all Slave inverters have the 'No Meter' Mode correctly configured.
Prerequisites
To establish a connection to your inverter, ensure that you have the 'SolisCloud' app installed on your phone. If you do not already have the app, please use the following codes to install it.

Connecting to your Inverter (First time login for INSTALLERS)
To establish a local connection, ensure that your device's Bluetooth is enabled.
Open the SolisCloud App and DO NOT LOGIN.
1: Navigate to the "More Tools" button on the bottom right-hand side.
2: Click on "Local Operation."
3: Select the "Connect with Bluetooth" button

4: Your device should appear in the "Nearby Devices" section. Click on your device and verify the serial number.
5: Click on "Select account type."
6: Choose the "Installer" option.
.png)
7: When accessing the inverter for the first time, you will be asked to set a password. Please follow the on-screen instructions. Once the password is set, press “Set Password”.

After saving the password, you will now be connected to your inverter.
Solis Quick Settings Overview
The Quick Settings will appear on your screen.
These are the 5 basic settings that need to be configured for the inverter to function properly.
1: Begin by setting the correct inverter time, or simply follow the phone time and press 'Next Step.'
2: Once the time is set, choose the correct battery model. Note: If you do not have a battery connected, please select 'No Battery.' Click on 'Next Step.'
3: In the third step, choose the correct meter and its placement. Refer to the instructions for your model for accurate meter placement.
Note: If you do not have a meter connected, please select 'No Meter.' Click on 'Next Step.'

4: In the next step, choose the correct Grid code for your area.
5: Grid Codes are sorted by country names.
6: Once you have selected your country, various codes will be displayed. Please choose the correct one and click on “Save”.
If you are unsure about which grid standard to use, contact your local energy provider for more details.

7: In the last step of the Quick Settings, choose the mode that you want to apply. There are four different modes available:
Self-Use Mode
Feed-in Priority Mode
Peak Shaving Mode
Off-Grid Mode

Solis Inverter Self-Use Mode
Self-Use Mode is designed to optimize the consumption of solar energy within a residential setting.
In this mode, the system prioritizes directing all photovoltaic (PV) energy generated towards powering the home. Any surplus energy not immediately required by the household is intelligently stored in connected batteries. Only after the batteries are fully charged will any excess energy be fed back into the grid.
In the absence of a battery system, the remaining surplus energy can be seamlessly exported to the utility grid, provided the system is configured accordingly. Most people in the European region will want to be using this mode over the others.
A: Self-Use Mode is activated without any specific times set for the battery to charge/discharge, and the battery reserve is not switched on.
Note: Solis recommends activating the 'Allow Charging from Grid' option. Once the battery reaches the Forcecharge SOC, it will use the grid to charge the battery, preventing deep discharge.
B: Activating the 'Time of Use Switch' will provide customers with several options to set charging/discharging times and current.
C: Setting the charge or discharge current within the range of 0-50A.

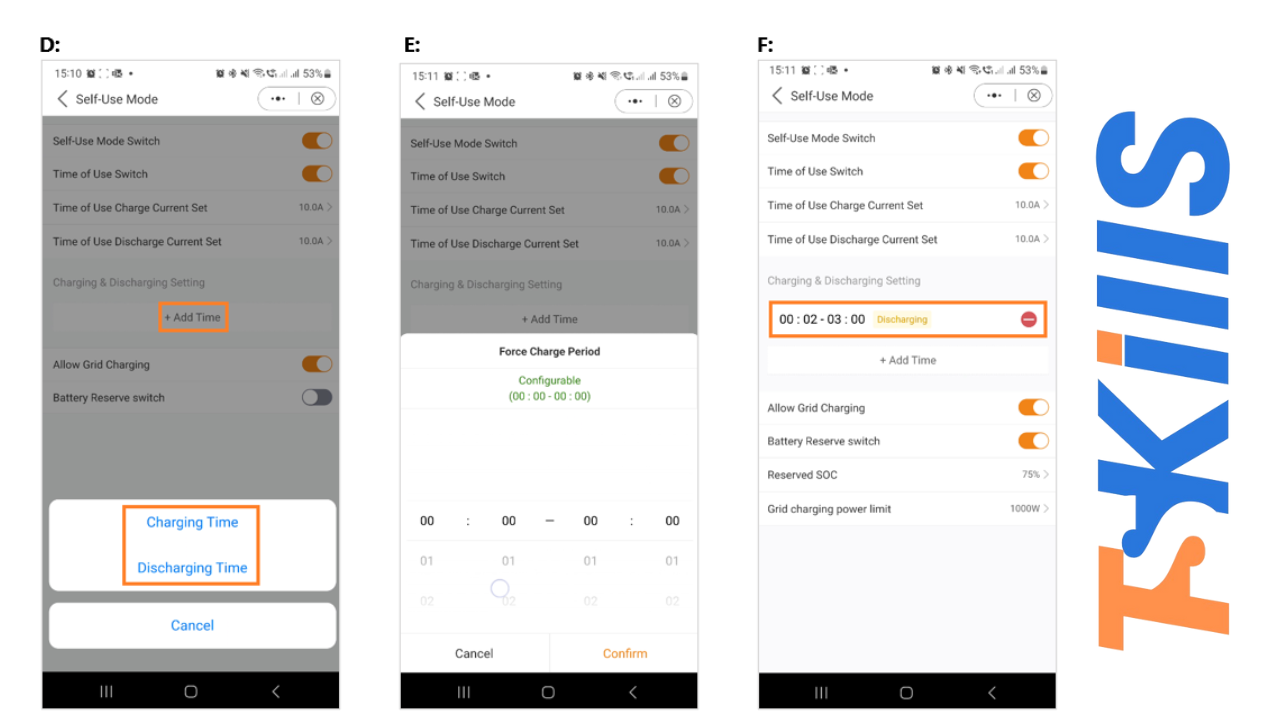
D: If you want to set a specific charging or discharging value on your inverter, please first press "Add time" and then choose accordingly – Charging or Discharging Times.
E: In the next step, please choose the actual time range for either Force Charge or Discharge.
F: Once the Charge/Force charge period has been set, you will see the details on the screen.
G: The Self-Use Mode provides you with the option to set a Battery reserve value. Please toggle the switch to activate the battery reserve mode.
H: You can set a range between 20% and 100% of the battery SOC. The inverter will strive to maintain the battery at the chosen set level.
I: Finally, you have the option to establish a power limit that can be drawn from the grid side.

This completes the guide for the self-use mode. As mentioned before, the self-use mode is likely the setting you want for your inverter.
Solis inverter Feed in Priority Mode
Introducing the second Mode Option offered by Solis Inverters. Activating this mode directs the system to prioritize the sale of power to the grid. Consequently, the battery will remain inactive—neither charging nor discharging—unless Time Charging is enabled and properly configured. The Feed-In Priority mode is particularly well-suited for individuals with expansive PV systems in comparison to their power consumption and battery capacity. The primary objective of this mode is to maximize power sold to the grid, utilizing the battery only during brief intervals or in the event of a grid power outage.
The Feed-in Priority Mode bears a striking resemblance to the Self-Use Mode when observed through the app.
Both modes provide the flexibility to define specific Charging and Discharging times, along with the ability to set Charging and Discharging Current. Additionally, users can establish a designated battery reserve State of Charge (SOC), and there is the option to restrict the power drawn from the grid side in both modes.
